

Who is online?
In total there are 3 users online :: 0 Registered, 0 Hidden and 3 Guests None
Most users ever online was 112 on 8th October 2020, 7:09 am
Latest topics
» Hungry Birdsby Dirick55 7th December 2023, 6:04 am
» PRESENTATION
by Chilli-head 23rd November 2023, 2:55 pm
» New Kiva loan
by Chilli-head 21st July 2023, 12:35 pm
» A peat-free compost is top in UK Which? magazine trial
by Dandelion 25th April 2023, 9:42 pm
» New gardening year 2023
by Chilli-head 5th March 2023, 10:15 pm
» What have I done in the workshop today?
by Dandelion 2nd December 2022, 1:12 pm
» What are you harvesting today?
by Dandelion 2nd December 2022, 1:12 pm
» Wartime marrow casserole
by Dandelion 18th October 2022, 4:42 pm
» Late sowings in August ... beans ?
by Ploshkin 11th August 2022, 9:29 am
» Come August, come night in the garden
by Chilli-head 4th August 2022, 3:29 pm
» Welcome guest
by Ploshkin 31st July 2022, 9:16 am
» The Jolly July Garden
by Ploshkin 19th July 2022, 11:38 am
» More mead ...
by Chilli-head 13th July 2022, 12:52 pm
» The June garden thread
by Dandelion 25th June 2022, 9:55 pm
» Plastic bags
by Dandelion 5th June 2022, 7:28 pm
» The merry May garden
by Dandelion 31st May 2022, 10:04 pm
» Fooling around in the April garden
by freebird 1st May 2022, 8:33 am
» March into the garden
by Dandelion 1st April 2022, 7:26 pm
» Mow Suggestions
by freebird 29th March 2022, 5:48 pm
» Some thoughts on resilience
by Ploshkin 12th March 2022, 2:23 pm
Statistics
We have 270 registered usersThe newest registered user is Lloyd
Our users have posted a total of 48045 messages in 2416 subjects
Similar topics
Pages we like:

First Chair - work in progress
5 posters
Page 1 of 1

First Chair - work in progress
![]() by Chilli-head 13th July 2014, 9:08 pm
by Chilli-head 13th July 2014, 9:08 pm
So, having acquired a suitable ash log the other weekend, I figure it is time. Can't call yourself a bodger without making a chair, so here goes. The design I'm aiming for is a Philip Clissett style spindle back (google will find lots of examples too). But I'm going to vary it a bit by replacing the wood board seat with a woven seagrass one; this might not be traditional but it will better match my stool.
The rules I've set myself are that I want to use no power tools, and no sanding - the shaved or lathe turned finish should be good enough without.
So, to start:

This is half an ash trunk, about 5 foot long. Spiltting again with metal wedges:

This is repeated again to spilt into 1/8ths, to get the two back legs, which are then shaped by axe and on the shave horse (it had started to rain, so moved indoors !)

Here I've been using a French drawkinfe, and a scrap of plywood with a 1 3/4" hole drilled in it as a gauge - when it slides along the leg, it is the right size.
Having got the long bits, and stashed them in a plastic sack to keep them green, now the spindles for the spindle back. Roughed out by axe, and just starting to knock the corners off on the lathe - again indoors using the bungee instead of a pole.

Number one of four completed:

Time for a cuppa. To be continued as time permits ...
The rules I've set myself are that I want to use no power tools, and no sanding - the shaved or lathe turned finish should be good enough without.
So, to start:
This is half an ash trunk, about 5 foot long. Spiltting again with metal wedges:
This is repeated again to spilt into 1/8ths, to get the two back legs, which are then shaped by axe and on the shave horse (it had started to rain, so moved indoors !)
Here I've been using a French drawkinfe, and a scrap of plywood with a 1 3/4" hole drilled in it as a gauge - when it slides along the leg, it is the right size.
Having got the long bits, and stashed them in a plastic sack to keep them green, now the spindles for the spindle back. Roughed out by axe, and just starting to knock the corners off on the lathe - again indoors using the bungee instead of a pole.
Number one of four completed:
Time for a cuppa. To be continued as time permits ...
Last edited by Chilli-head on 31st May 2018, 4:29 pm; edited 2 times in total

Chilli-head- Admin and Boss man
- Posts : 3305
Join date : 2010-02-23
Location : Bedfordshire
Re: First Chair - work in progress
![]() by Ploshkin 14th July 2014, 10:13 am
by Ploshkin 14th July 2014, 10:13 am
Ooh that's an interesting set of pictures CH. I can never quite get my head round how you get from a tree trunk to the finished article. I'm eagerly awaiting the next instalment now.
Presumably you lathe by eye referring to the profile drawn on the piece of card but how do you get 2 (or more) legs exactly the same? Is it just down to having a really good eye?
Presumably you lathe by eye referring to the profile drawn on the piece of card but how do you get 2 (or more) legs exactly the same? Is it just down to having a really good eye?

Ploshkin- Posts : 1779
Join date : 2013-07-18
Location : Mid Wales
Re: First Chair - work in progress
![]() by Chilli-head 14th July 2014, 10:32 am
by Chilli-head 14th July 2014, 10:32 am
Ploshkin wrote:Presumably you lathe by eye referring to the profile drawn on the piece of card but how do you get 2 (or more) legs exactly the same? Is it just down to having a really good eye?
Good eye is the most important, but a tape measure, calipers and a pencil help. I first drew what I was aiming for on the bit of masking tape as a rough guide, with a couple of key diameters (for the tenons at each end) pencilled on. This means you can get the rough shaping done quite quickly. Then I make a cylinder, using a 24mm open ended spanner as a convenient gauge. I measure and mark the key positions of the bead, etc n pencil, then use the tip of the skew chisel to make a more permanent mark. Most of the rest is by eye, but the really inportant bit - the tenon ends, are checked with a vernier caliper till they are the size of the drill I'll use for the mating holes, +10% to allow for shrinkage in drying.
Having made one, it is best to mark this one and compare the copies by holding the original alongside as you work - if you loose track of which is your "master" spindle, it can end up a bit like the woodturning version of Chinese whispers !
Don't hold your breath - lots more to do. There are 22 pieces to make. And some of them - including those back legs - need steam bending. Looking forward to that.
Chilli-head- Admin and Boss man
- Posts : 3305
Join date : 2010-02-23
Location : Bedfordshire

Jaded Green- Homemade Moderator
- Posts : 2321
Join date : 2009-11-09
Location : London

Dandelion- Admin
- Posts : 5416
Join date : 2010-01-17
Age : 67
Location : Ledbury, Herefordshire
Re: First Chair - work in progress
![]() by Chilli-head 22nd July 2014, 11:52 am
by Chilli-head 22nd July 2014, 11:52 am
A lot of work later, and I have a full set of the turned parts. No need to go for a run this week !

By the time I was done last night it was dark, so not the crispest photo. Clockwise from top left - four back spindles. Three rails for the back - these need to be bent into a gentle curve for comfort. A pair of front legs. The back legs (not shown) are not turned - they are too lonk for the lathe - just shaped with drawknife, and will also need to be bent. For the front legs it seemed like a good opportunity for some twiddly bits ! Then a large collection of seat rails ans stretchers - the longer ones are for across the front. These are not yet trimmed to length; doing so removes the original centres so that they can't readily be put back on the lathe. I'm holding off doing that until my shiny new Clico brace bit arrives for drilling the mortices. These augers do vary a bit, being hand forged, so if need be I can still adjust the spindle tenons to suit.
By the time I was done last night it was dark, so not the crispest photo. Clockwise from top left - four back spindles. Three rails for the back - these need to be bent into a gentle curve for comfort. A pair of front legs. The back legs (not shown) are not turned - they are too lonk for the lathe - just shaped with drawknife, and will also need to be bent. For the front legs it seemed like a good opportunity for some twiddly bits ! Then a large collection of seat rails ans stretchers - the longer ones are for across the front. These are not yet trimmed to length; doing so removes the original centres so that they can't readily be put back on the lathe. I'm holding off doing that until my shiny new Clico brace bit arrives for drilling the mortices. These augers do vary a bit, being hand forged, so if need be I can still adjust the spindle tenons to suit.
Last edited by Chilli-head on 31st May 2018, 4:30 pm; edited 1 time in total
Chilli-head- Admin and Boss man
- Posts : 3305
Join date : 2010-02-23
Location : Bedfordshire
Re: First Chair - work in progress
![]() by Chilli-head 28th July 2014, 4:49 pm
by Chilli-head 28th July 2014, 4:49 pm
Did a bit more this weekend.
This time, steam bending. I thought I'd start small with the 3 back rails that needed to be bent, and work up to the legs. First a bit of improvisation to raise steam !

Following Mike Abbott's method, this is an offcut of 4" plastic wastepipe, cradled in the saw horse I normally use for cutting up firewood. The ends are bunged up with flowerrpots stuffed with bubble wrap for insulaton, and the pipe wrapped with an old blanket. Steam is provided by a wallpaper steamer. Now, this might class as a power tool which could be seen as cheating, but I'm going to allow myself that one ! Ideally a wood burning boiler would be better, especially one to use the (copious) wood shavings I'm left with .. Future project I reckon.
45 minutes later:
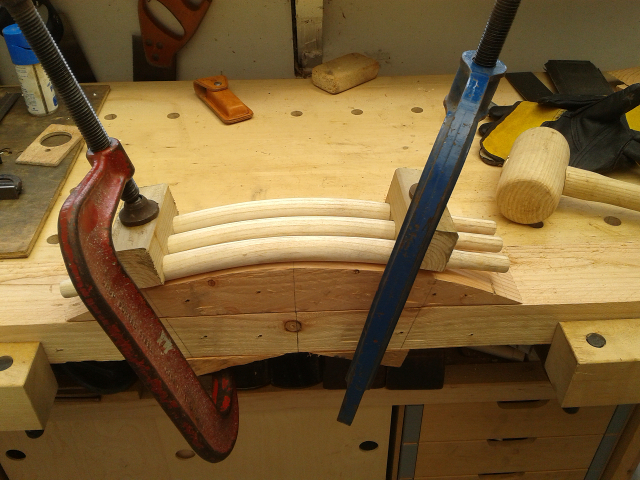
The hot pieces are quickly clamped in the desired shape using a jig It is basically one length of 3x4, with a "hump" of radius 18" screwed to it. The hump is placed in the correct spot to do the bend for the rear legs on the same jig later. The two wedges pinned to the underneath set the clamps at the right angle. As the wood compresses more readily than stretches, I hoped that canting the clamps over like this might make it less likely to crack at on the outsice of the curve. A bit of 2x4 with holes bored through it then spilt in half makes a handy pair of clamping blocks, but I reckon 3 clamps would be better - one on the high spot just to hold everything together and reduce the juggling !
Time to steam the legs next. I'll need a longer bit of pipe for those !
This time, steam bending. I thought I'd start small with the 3 back rails that needed to be bent, and work up to the legs. First a bit of improvisation to raise steam !
Following Mike Abbott's method, this is an offcut of 4" plastic wastepipe, cradled in the saw horse I normally use for cutting up firewood. The ends are bunged up with flowerrpots stuffed with bubble wrap for insulaton, and the pipe wrapped with an old blanket. Steam is provided by a wallpaper steamer. Now, this might class as a power tool which could be seen as cheating, but I'm going to allow myself that one ! Ideally a wood burning boiler would be better, especially one to use the (copious) wood shavings I'm left with .. Future project I reckon.
45 minutes later:
The hot pieces are quickly clamped in the desired shape using a jig It is basically one length of 3x4, with a "hump" of radius 18" screwed to it. The hump is placed in the correct spot to do the bend for the rear legs on the same jig later. The two wedges pinned to the underneath set the clamps at the right angle. As the wood compresses more readily than stretches, I hoped that canting the clamps over like this might make it less likely to crack at on the outsice of the curve. A bit of 2x4 with holes bored through it then spilt in half makes a handy pair of clamping blocks, but I reckon 3 clamps would be better - one on the high spot just to hold everything together and reduce the juggling !
Time to steam the legs next. I'll need a longer bit of pipe for those !
Last edited by Chilli-head on 31st May 2018, 4:32 pm; edited 1 time in total
Chilli-head- Admin and Boss man
- Posts : 3305
Join date : 2010-02-23
Location : Bedfordshire
Re: First Chair - work in progress
![]() by freebird 28th July 2014, 6:23 pm
by freebird 28th July 2014, 6:23 pm
This is fascinating. Looking forward to the next instalment. How long do the steamed pieces need to stay clamped?

freebird- Posts : 2244
Join date : 2011-10-19
Age : 67
Location : Powys
Re: First Chair - work in progress
![]() by Chilli-head 29th July 2014, 1:46 pm
by Chilli-head 29th July 2014, 1:46 pm
That is a jolly good question. I have a number of books, and they are all evasive on this issue. Some say - and it is obviously true to an extent - that it depends on how green the wood is, etc etc ...
So I've had to make up my own mind. My reckoning is that it is not the steam per say that softens the wood, but the heat - the steam is simply a way of heating without overheating or drying out. So, I assume that "until cool" is probably OK, rather than "Until cool and dry" as suggested by some books. I don't want it to dry too much, because I want to use the drying shrinkage to tighten up the joints without glue. So I left mine just overnight - say 10 hours in the relative cool - before unclamping. There is a little spring back, but I was aiming for a 20" final radius of curvature, with a slightly tighter 18" former to allow for this.
Did the legs last night. I'm hoping to clean them up tonight - I had not finally finished them smooth until after bending to remove any claming marks, dirty workman's finger marks etc. With luck, I can start assembly on Wednesday.
Chilli-head- Admin and Boss man
- Posts : 3305
Join date : 2010-02-23
Location : Bedfordshire
Re: First Chair - work in progress
![]() by Ploshkin 30th July 2014, 4:12 pm
by Ploshkin 30th July 2014, 4:12 pm
I'm glad to be able to see the pictures at last. I get some odd images in my head reading the (very good) descriptions of the process but I always need to have a proper picture in my head to fully understand. It's looking great, must be quite exciting getting to the assembly stage.
Ploshkin- Posts : 1779
Join date : 2013-07-18
Location : Mid Wales
Re: First Chair - work in progress
![]() by Chilli-head 31st July 2014, 1:43 pm
by Chilli-head 31st July 2014, 1:43 pm
You're right Ploshkin. It might be slightly sad to admit it  , but putting it together was pretty exciting.
With that kit of bits, it is a matter of drillig a lot of holes with a hand brace, using squares and a sliding bevel as sighting aids to get the angles right:

Then knocking it together with a big mallet. This seems a bit brutal, but seems to mark the wood less than any alternative method I've tried. No glue needed- the shrinkage of the green legs around the relatively dry rails should be enough to make a lasting joint. Looks a lot more like a chair now:

Just got need to oil it, weave a seat then trim the back legs down when it is dry and has finished moving. They're left 1/2" long to allow for adjustment.
With that kit of bits, it is a matter of drillig a lot of holes with a hand brace, using squares and a sliding bevel as sighting aids to get the angles right:
Then knocking it together with a big mallet. This seems a bit brutal, but seems to mark the wood less than any alternative method I've tried. No glue needed- the shrinkage of the green legs around the relatively dry rails should be enough to make a lasting joint. Looks a lot more like a chair now:
Just got need to oil it, weave a seat then trim the back legs down when it is dry and has finished moving. They're left 1/2" long to allow for adjustment.
Last edited by Chilli-head on 31st May 2018, 4:33 pm; edited 1 time in total
Chilli-head- Admin and Boss man
- Posts : 3305
Join date : 2010-02-23
Location : Bedfordshire
Re: First Chair - work in progress
![]() by Ploshkin 31st July 2014, 9:46 pm
by Ploshkin 31st July 2014, 9:46 pm
Wow, it's looking good. Can I order a set of 6 please!
Ploshkin- Posts : 1779
Join date : 2013-07-18
Location : Mid Wales
Re: First Chair - work in progress
![]() by freebird 31st July 2014, 10:02 pm
by freebird 31st July 2014, 10:02 pm
Nonsense! It's a crying shame that more people don't get excited about stuff like that.Chilli-head wrote:You're right Ploshkin. It might be slightly sad to admit it
freebird- Posts : 2244
Join date : 2011-10-19
Age : 67
Location : Powys
Re: First Chair - work in progress
![]() by Chilli-head 31st July 2014, 11:22 pm
by Chilli-head 31st July 2014, 11:22 pm
freebird wrote:Nonsense! It's a crying shame that more people don't get excited about stuff like that.Chilli-head wrote:You're right Ploshkin. It might be slightly sad to admit it
I don't know whether to feel chastised or pleased. Rather like when I go to the bodgers' ball, it is nice to feel that you are - at least in some contexts - relatively normal
That set of six Ploshkin. You know I was mulling on that. There are 22 components to the chair, 20 of them turned. So a set of six .. 120 turned parts. Quite a job. But it would look rather nice. We still have one of those Habitat/Ikea/whatever black painted dining table/chairs, which one day I must replace with something nice.
Chilli-head- Admin and Boss man
- Posts : 3305
Join date : 2010-02-23
Location : Bedfordshire
Re: First Chair - work in progress
![]() by freebird 1st August 2014, 8:38 am
by freebird 1st August 2014, 8:38 am
Sorry, that was a bit abrupt. I was in the middle of helping the man with some office work, and posted while waiting for him to complete something - then he wanted my attention all of a sudden.
Spose what I was trying to say was it's a shame that so many people seem to think that excitement can only come from loud, frenetic, adrenalin-pumping activities. I don't think your excitement at assembling all those carefully designed components is at all sad, and I definitely don't think you should apologise for it.
Spose what I was trying to say was it's a shame that so many people seem to think that excitement can only come from loud, frenetic, adrenalin-pumping activities. I don't think your excitement at assembling all those carefully designed components is at all sad, and I definitely don't think you should apologise for it.
freebird- Posts : 2244
Join date : 2011-10-19
Age : 67
Location : Powys
Re: First Chair - work in progress
![]() by Chilli-head 11th August 2014, 12:31 pm
by Chilli-head 11th August 2014, 12:31 pm
Finished it on Friday night.
Before weaving the seat I applied a thin coat of Danish oil with a cloth, then when that was dry, two coats of homemade wax polish (2:2:1 mix of beeswax from FIL's bees, natural turpentine, raw linseed).
The seat I wove using seagrass. I made an error in estimating how much seagrass I would need, so the warp and weft are different batches, the weft being some left over from the stool. It gives a slight two tone effect - the warp is slightly greenish and smoother. I have convinced myself that I like it that way and so it is a happy accident. Here's the finished chair:

Just an ash log, some seagrass cord, oil and wax. No glue, nails, tacks, sanding or power tools.
Before weaving the seat I applied a thin coat of Danish oil with a cloth, then when that was dry, two coats of homemade wax polish (2:2:1 mix of beeswax from FIL's bees, natural turpentine, raw linseed).
The seat I wove using seagrass. I made an error in estimating how much seagrass I would need, so the warp and weft are different batches, the weft being some left over from the stool. It gives a slight two tone effect - the warp is slightly greenish and smoother. I have convinced myself that I like it that way and so it is a happy accident. Here's the finished chair:
Just an ash log, some seagrass cord, oil and wax. No glue, nails, tacks, sanding or power tools.
Last edited by Chilli-head on 31st May 2018, 4:34 pm; edited 1 time in total
Chilli-head- Admin and Boss man
- Posts : 3305
Join date : 2010-02-23
Location : Bedfordshire
Re: First Chair - work in progress
![]() by Ploshkin 11th August 2014, 12:57 pm
by Ploshkin 11th August 2014, 12:57 pm
That's a fantastic achievement CH & all the more so because of the no nails, glue etc. I love the simplicity of the design. I hope you're feeling very proud of yourself.
Ploshkin- Posts : 1779
Join date : 2013-07-18
Location : Mid Wales
Re: First Chair - work in progress
![]() by freebird 11th August 2014, 9:17 pm
by freebird 11th August 2014, 9:17 pm
That is lovely, CH - the two-tone seagrass shows in the photo, and I think looks really nice.
freebird- Posts : 2244
Join date : 2011-10-19
Age : 67
Location : Powys
Page 1 of 1
Permissions in this forum:
You cannot reply to topics in this forum|
|
|